Tuesday, December 27, 2011

Oatmeal... FAIL?

Hope everyone had a great holiday!  I am back to the grind, so here we go...

As a kid I hated oatmeal.  It was just so mushy and icky.  I'm an adult now (sorta), so naturally, I've learned to like it and this cold weather has me itching for a hot breakfast.  We have about 100 inherited packets of instant oatmeal in our cupboard, so I figured I would do a Bake or Buy on making my own oatmeal.  So good straight from the stove top.

Store Brand: Instant Maple and Brown Sugar

My Recipe (this is just how I make it - use whatever toppings you like):
1/2 cup old fashioned oats
1 cup skim milk
Spoonful of dried cranberries
Spoonful of chopped walnuts
1 tsp brown sugar
pinch of cinnamon

- I start by putting the milk on the stove with the cranberries and heat it to a low simmer.
- Add the oats and cook on low heat for about 5 minutes.


- Put it in a bowl and let it sit a few more minutes to thicken.


- Add sugar, cinnamon, and walnuts.


- Stir and enjoy!

So my homemade oatmeal turned out great.  Surprisingly enough, the issue came in when I made the instant!  I know, crazy.  Since I am not a big fan of instant oatmeal, I just read the bag which had two options - add boiling water to the packet, or add milk or water and cook in the microwave.  I added milk and put it in the microwave for 2 minutes (packet read 2 - 3 mins).  I was busy with the stovetop oatmeal and when I went to grab the instant - AHHHHH!


Hmm, not such a great way to start my morning after all!  Anyways, I will compare them for the sake of competition.

The instant oatmeal was very thick and almost like paste.  The flavored packet (brown sugar and maple) was far too sweet for my tastes as well.  Obviously, the instant oatmeal here isn't winning any awards.


I was fairly surprised by the cost.  With all my gourmet toppings, I assumed it would cost more, but if you make the instant with milk it's just about the same cost (the instant makes a little less than my recipe).


AmountCostCost/cup
Quaker Instant Oatmeal2/3 cup $      0.42  $           0.63
Homemade1 cup $      0.66  $           0.66

Bake or Buy?  BAKE!

Wednesday, December 21, 2011

Vanilla Extract

Making your own vanilla extract?  This is SO easy.  I have no idea why people aren't doing it.  I actually realized how expensive vanilla was when I was calculating the cost of homemade Oreos and wondered how you would make your own.  Alas, there are lots and lots of people out there talking about how to do it - so here we go.

The store brand: McCormick Pure Vanilla

My Recipe:
1 cup vodka (I used Stolichnaya from duty-free, but normally I would go Svedka)
4 vanilla beans
1 tablespoon brown sugar (the store brand used corn syrup so I figured what the heck)

- Slice the vanilla beans lengthwise and scrape out the good stuff.  Chop up the shells into 1" pieces. 


- Combine the vodka and all the bean parts and let it sit for at least 1 month (up to 6 months).


- Strain out the solids before using.  I put it through a stainer to get the big pieces out and then a coffee filter to remove most of the vanilla beans.  Step two completely optional. 


The bean pods are still flavorful and vanilla is expensive - you can reuse them to make vanilla sugar or flavor your coffee!

I read up quite a bit, and it sounds like 4 or 5 vanilla beans to 1 cup vodka will give you the same concentration as a typical store brand.  I used Madagascar beans (they were the most affordable at $1.50 a piece), but there are lots of varieties out there.


My vanilla does look a little lighter than the store brand.  Taste-wise, they taste VERY similar.  I'm not sure if the concentration is the same, if you want something to have a really strong vanilla taste, maybe use a little extra, but it seems to do the job!

So how does the cost work out?  Wow, it costs a LOT less to make your own vanilla extract.  I will say my grocery store does have half price vanilla once in a while, which is when I stock up.  Even with that sale price, I can still make my own cheaper.


          Size     Cost     Cost/Oz
McCormick Pure Vanilla Extract2 fl oz $      7.99  $           4.00
Homemade1 cup $    10.00  $           1.25


So bake or buy?  BAKE!

I will say my complete lack of planning will probably put me buying this stuff in a pinch, but I'm going to try to keep up with it!  And that cup of vanilla should last me a long time - maybe I'll put it on the list to do every year when I do my canning.

Monday, December 19, 2011

Bagels

Another bread-making opportunity!  I'm excited for the smell of the house and to eat some warm chewy bagels.

Now, if I lived in NYC, I wouldn't even bother doing this test.  They have the BEST bagels.  Crispy on the outside and chewy on the inside - don't even ask to have it toasted.  AMIRIGHT?  Anywho, I don't live there, and I'm going to look to replace my grocery store bagels with something better.  Here we go!

The Store Brand: Thomas' Everything Bagels

My Recipe (adapted from http://www.lifecurrents.dw2.net/):

Egg Bagels
1 ¼ cups lukewarm water
2 large eggs, lightly beaten
1 ½ tablespoons sugar
4 teaspoons active dry yeast
1 tablespoon grapeseed or light olive oil
3 ½ – 4 ½ cups unbleached bread flour
1 tablespoon salt
1 tablespoon sugar
½ teaspoon salt
1 large egg white, lightly beaten
Toppings - use whatever your heart desires - I used 2 tablespoons sesame seeds, poppy seeds, and garlic powder

- Whisk together water, eggs, 1 ½ tablespoons sugar, yeast, and oil in a large bowl until the yeast dissolves.
- Stir in 1 cup of the flour. Then stir in 1 tablespoon salt and enough additional flour to make a soft dough, about 2 ½ cups.
- Turn the dough out onto a lightly floured surface and knead, gradually incorporating more flour, until the dough is smooth and quite firm, 10 to 12 minutes.
- Cover with a towel and let rest for 10 minutes.
- Divide the dough into 12 pieces; roll each piece into a 10-inch-long rope. Form into bagels by overlapping the ends up 1 inch. Pinch ends together firmly.
- Set bagels aside, uncovered, to rise until slightly puffy, about 20 minutes.


- Meanwhile, preheat oven to 425°F.
- Line 1 large baking sheet with parchment paper and set aside.
- Bring 6 quarts water, 1 tablespoon sugar, and ½ teaspoon salt to a boil in a large pot.
- Get your egg wash and topping ready to go, because the next few steps go fast.


- Slip about 3-4 risen bagels at a time into the pot; the water should be at a lively simmer. Cook for 45 seconds, turn them over, and cook for another 45 seconds.


- Drain the bagels on a clean dish towel, and place on the prepared baking sheet.
- Brush the tops of the bagels with egg white and sprinkle each with ½ teaspoon of your chosen topping, if using.


- Bake for 15 minutes. Turn over and bake until golden brown, about 5 more minutes.


- Freeze fresh bagels (once cooled), unless you are eating them all that day (don't laugh - you might!).

I just made a half batch - very easy recipe to split.  And the taste?  They were SO amazing.  The bottoms were perfectly crispy - next time I will probably leave the tops under the broiler for just a minute to get them a little crispier.  Thomas' just weren't good - no crisp to the crust at all.  If you're going to buy your bagels, get them from a bakery - packaged bagels just aren't the same.


And the cost?  Wowser, Thomas' bagels are no joke - I guess that's why I always buy them when they are BOGO (buy one, get one free).  Even at half price, they cost almost twice as much as homemade!  Fair enough, mine are smaller, but you could easily make them larger and they would still cost less.

       Count    Cost  Cost/Bagel
Thomas' Bagels - Everything6 Bagels $     4.49  $          0.75
Homemade12 Bagels $     2.41  $          0.20

So Bake or Buy?  BAKE!

See this post and more:
  • Tastetastic Thursday at A Little Nosh
  • Thursday, December 15, 2011

    Mashed Potatoes

    We love mashed potatoes in our house - loads of butter and sometimes sour cream or cream cheese.  Mmmmm.  And I'll have to say... I did something VERY exciting with these mashed potatoes...

    OMGoodness - I made a famous bowl, just like KFC, but better (and sans chicken)
    Back to the mashed potatoes:

    The Store Brand: Betty Crocker Creamy Butter

    My Recipe (adapted from from http://www.allrecipes.com/):
    Ingredients:
    6 medium russet potatoes, peeled and cubed
    1/2 cup warm milk
    1/4 cup butter or margarine
    1/2 teaspoon salt
    Dash pepper

    Directions:
    - Place potatoes in a saucepan and cover with water.


    - Boil for 20-25 minutes or until very tender.
    - Drain well (I add the potatoes back to the hot pan to evaporate all the water).


    - Add milk (make sure it's warm), butter, salt and pepper; mash until light and fluffy - I used my mixer to get them super creamy.


    So great.  I love mashed potatoes.  If I were going to eat them plain, I would mix in some extras, but today they will have PLENTY of pizzaz.

    Mike are on the left and Betty Crocker's on the right
    Taste test is interesting - I can't lie, Betty Crocker's weren't terrible.  They were a little too salty for me, but they were pretty darn creamy.  There were two options - microwave with all water or stovetop with milk and water, so I went with the latter.  They really were pretty tasty, but I mean the homemade are just better.

    And how about the cost? So potatoes are really cheap, which helps out on this recipe.  Even though the Betty Crocker mix is pretty inexpensive, it just can't win.

      Amount    Price   Cost/cup
    Betty Crocker2.25 cups $     1.25  $          0.56
    Homemade4.5 cups $     1.55  $          0.34

    Bake or Buy?  BAKE!

         And now for the good part.
         Mashed potato bowls:
           3 cups mashed potatoes
           1/2 cup prepared gravy
           1/2 cup shredded cheddar cheese
           1/2 cup frozen corn
           dash hot sauce

         Once the mashed potatoes are made, the rest is history.  Layer with gravy, corn, and cheddar cheese, then top with liberal amount of Frank's Red Hot.  Amazingness.

    Monday, December 12, 2011

    Oreos

    Oreos are not my favorite cookie.  In fact, I generally enjoy fruity desserts more than chocolate.  But my husband loves Oreos and I'll be shipping most of these out as part of the Great Cookie Swap. 

    If you haven't heard, the Great Cookie Swap is a food blogger event, where bloggers make cookies, send them to other bloggers, and get a bunch in return.  Cookies in the mail??  How exciting!  And look at this mountain of cookies in the works:


    So anyways... The store brand: Oreos. (Nabisco)

    For the chocolate wafers:
    1 1/4 cups all-purpose flour
    1/2 cup unsweetened Dutch process cocoa
    1 teaspoon baking soda
    1/4 teaspoon baking powder
    1/4 teaspoon salt
    1 to 1 1/2 cups sugar [see recipe note]
    1/2 cup plus 2 tablespoons (1 1/4 sticks) room-temperature, unsalted butter
    1 large egg
    For the filling:
    1/4 cup (1/2 stick) room-temperature, unsalted butter
    1/4 cup vegetable shortening
    2 cups sifted confectioners’ sugar
    2 teaspoons vanilla extract

    - Set two racks in the middle of the oven. Preheat to 375°F.
    - In a food processor, or bowl of an electric mixer, thoroughly mix the flour, cocoa, baking soda and powder, salt, and sugar.
    - While pulsing, add the butter, and then the egg and process until it forms a mass.
    - Take rounded teaspoons of batter and place on a parchment paper-lined baking sheet approximately two inches apart. With moistened hands, slightly flatten the dough. Bake for 9 minutes, rotating once for even baking. Set cookies on a rack to cool.


    - To make the cream, place butter and shortening in a mixing bowl, and at low speed, gradually beat in the sugar and vanilla. Turn the mixer on high and beat for 2 to 3 minutes until filling is light and fluffy.
    - To assemble the cookies, in a pastry bag with a 1/2 inch, round tip, pipe teaspoon-size blobs of cream into the center of one cookie. Place another cookie, equal in size to the first, on top of the cream. Lightly press, to work the filling evenly to the outsides of the cookie. Continue this process until all the cookies have been sandwiched with cream. Dunk generously in a large glass of milk.

    And the outcome?  The cookies were great.  I guess I expected them to be soft and more like a whoopie pie, but the chocolate cookies were really crunchy, just like an Oreo (after a day in a container, they got soft from the filling and I think they were even better that way)!  The filling was better than the competitor - and I filled them almost to the point of a double stuffed Oreo.  I said I wasn't a huge fan of Oreos... but I could eat 10 of these.


    The cost was actually pretty interesting.  With all the butter, vanilla, and cocoa powder, I thought the store bought version would cost much less to buy.  It was close, but the homemade cookie came in at just a few pennies more per cookie (they were also a little larger):

       Cookies    CostCost/Cookie
    Oreos
    30
     $      4.39  $          0.15
    Homemade
    28
     $      5.14  $          0.18

    So, my opinion here is if you are going to eat a cookie, it might as well be delicious and you should have to work for it (a little).  This recipe was made entirely in the food processor and the filling was really easy.  So come on, go the extra mile for your desserts, and earn those calories!

    Bake or Buy? BAKE!

    Saturday, December 10, 2011

    The Great Food Blogger Cookie Swap

    And the cookie swap is complete!  I shipped out three dozen of my Bake or Buy cookies (post on those to come Monday) and I've received three dozen cookies in return!

    Read all about it

    And they are:
    - Peppermint Mocha with a chocolate filling
    - ButterBeer (not a harry potter fan, so I probably don't get the reference, but they are butterscotch cookies with a butterscotch ganache filling)
    - Spiced Oatmeal Raisin (they have Chai Tea in them - I almost got past my "raisins are imposter chocolate chip feelings for these)


    All three of these cookies were delicious!  What a great cookie swap - can't wait for next years!

    The recipes for all three of those cookies will be up Monday - if you want them, they will be on the following blogs:
    Peppermint Mocha: www.delectablebakedgoods.com
    ButterBeer: www.peacelovebagels.com
    Spiced Oatmeal Raisin: www.chopsticksandmeasuringcups.blogspot.com

    Thursday, December 8, 2011

    Ravioli

    YAY!  My first attempt at using my pasta maker!  I'm very excited/nervous because this task is really intimidating me, even though I feel a little more confident since trying my hand at gnocchi.  I understand that my comparisons aren't quite fair - I am making a chipotle sweet potato ravioli and the store brand is basil, asiago, and pine nut pesto.  Deal with it.

    The Store Brand: Rising Moon Organics - Basil, Asiago, and Pine Nut Pesto Ravioli (couldn't they really just call these asiago and pesto...)

    My Recipe:
    Filling:
    1 large sweet potato
    1/4 cup coconut milk
    1 adobe pepper in sauce

    I baked the sweet potatoes (I used 3 small ones, and it was way too much filling) at 375ยบ for ~30 mins, then peeled them.  Put in the food processor with everything else and puree. 


    Turn these into this ---->


    Ravioli Dough (adapted from foodnetwork.com):
    2 cups all-purpose flour
    3 eggs
    1 tsp salt
    2 tbsp evoo

    - Combine the flour and salt on a flat work surface; shape into a mound and make a well in the center.
    - Add the eggs and 1 tablespoon of the olive oil to the well and lightly beat with a fork.


    - Gradually draw in the flour from the inside wall of the well in a circular motion; use 1 hand for mixing and the other to protect the outer wall. Continue to incorporate all the flour until it forms a ball. Knead for about 10 minutes until elastic.
    - Cover with plastic and let rest for 30 mins.


    - Cut the ball of dough in 1/2, and press the dough into a rectangle and roll it through a pasta machine, 2 or 3 times, at widest setting. Reduce the setting and crank the dough through again, 2 or 3 times.
    - Continue until the machine is at the narrowest setting; the dough should be about 1/8-inch thick.


    Dust the counter and sheet of dough with flour, lay out the long sheet of pasta, and brush the top surface with a beaten egg white, which acts as a glue.
    - Drop tablespoons of filling on 1/2 of the pasta sheet, about 2-inches apart.


    - Fold the other 1/2 over the filling like a blanket.
    - Gently press out air pockets around each mound of filling.

    - Use a sharp knife to cut each pillow into squares and crimp the 4 edges with the tins of a fork to make a tight seal.


    - Cook the ravioli in plenty of boiling salted water for 4 minutes; they'll float to the top when ready (don't overcrowd the pot).
    - Lift the ravioli out with a slotted spoon.

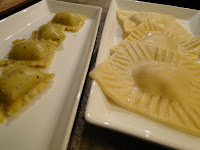
    So... my ravioli.  Ugh - I almost lost it during this process.  The dough was really, really dry, which made it hard to knead.  I added a little milk (probably not the right thing to do) and it was better, but still didn't seem quite right.  Getting it through the pasta roller took two people - could just be my inexpensive pasta maker.  Once they were cooked, the dough seemed a little hard - maybe not cooked long enough or my impromptu milk add-in, but they were floating away when I pulled them out.


    So obviously mine were huge compared to the packaged brand.  I didn't think mine had quite enough filling to pasta ratio - next time I will try to fill them fuller or cut them smaller.  The pasta didn't seem much better on the frozen kind - a little hard, maybe they all just needed to be cooked longer.

    The sweet potato filling in mine was very delicious - can't argue with that.  Overall, it just seemed like a lot of work for a decent piece of stuffed pasta.  I will try it again - stretching the pasta a little thinner, filling it more, and cooking a little longer.

    So the cost?  So even though the cost worked out the same, mine were about twice the size, and I could easily have made a LOT more out of that recipe.  So in reality, I'd say mine cost half as much as the store bought version.


      Ravioli Count     Cost       Cost/Piece
    Rising Moon Organics Ravioli30 $      2.99  $            0.10
    Homemade20 $      1.96  $            0.10

    But for now:
    Bake or Buy?  BUY.

    Tuesday, December 6, 2011

    Peanut Butter

    I always see the "grind your own pb" section at my health food store.  It's tempting, but stirring fresh peanut butter seems like a pain in the a$$, so i tend to stick to the regular processed store brands.  For this test, I am going to compare the store ground, regular Peter Pan, and a homemade version.


    The Store Brand(s): Peter pan creamy AND tidal creek freshly ground

    My Recipe:
    1 cup peanuts
    1 tsp honey
    1 tsp vegetable or peanut oil

    The homemade is pretty darn easy - put it in the food processor and let it go until it's the consistency of peanut butter.  You may need to add more oil if it seems dry.


    This entire process took maybe 1-2 mins in the food processor.  I ended up adding a little bit more oil, and left it just a little bit chunky.

    So the final products:

    Starting on the left is my homemade, middle is fresh ground from the store, and right it Peter Pan.  Husband and I tasted all three and we both agreed the fresh ground from the store was the best.  I'm pretty sure there are no add-ins to that type, but it tasted very similar to my homemade version.  The homemade seemed dry compared to the store ground - not sure if it's the peanuts they use, or the grinder.  The Peter Pan was, well, Peter Pan - creamy and salty.  It's good if you're into that sort of thing.

    And the cost?  Making your own peanut butter is pretty expensive compared to Peter Pan.  The grocery store type is basically just a vat of peanuts and you select how creamy/chunky you want it and then push the button to fill your container.  It was $3.99 a pound, which I estimated to be 1 3/4 cups.  Using my Planters dry roasted peanuts, the homemade version is actually really expensive, but I'm sure you can get peanuts a lot cheaper.  If you're willing to splurge a little on the cost, it seems like the fresh ground is your best choice.

    SizeCostCost/Cup
    Peter Pan Creamy Peanut Butter18 oz (2 cups) $      2.75  $            1.38
    Tidal Creek Fresh Grind1/2 cup $      1.15  $            2.30
    Homemade1/2 cup $      1.84  $            3.68


    Bake or Buy?  BUY... but buy the good, fresh stuff!